Salt painting is a fun and easy art technique that combines salt, watercolor, and glue to create beautiful, textured paintings. This activity is perfect for kids and adults alike, providing a fun and unique way to explore creativity while also learning about absorption and texture. Whether you’re looking for a rainy-day craft, a new artistic experiment, or an Easter craft, salt painting is an enjoyable and visually stunning choice. With Easter just around the corner, I’ve created some fun templates you can download for free. In this post, you’ll find Free Easter Salt Painting Templates.
Salt painting is always a fun activity for my son and I to do together. It’s very relaxing to apply the paint and watch it get absorbed in the salt. I’m pretty sure my son just likes to make a mess and that’s why he enjoys it! Either way, I’ve created a few Easter-themed templates that you can download for free.
In this blog post, you’ll find Free Easter Salt Painting Templates
What is a Salt Painting?
Salt painting is an art technique that uses salt, glue, and watercolor to create textured and colorful designs. The salt absorbs the liquid paint, causing the colors to spread and blend in unique ways. This simple yet fascinating craft is great for kids and adults, offering both a creative outlet and a fun way to explore science concepts like absorption and fluid dynamics. You can experiment with different colors, patterns, and even glow-in-the-dark variations to make your artwork stand out!
Materials Needed
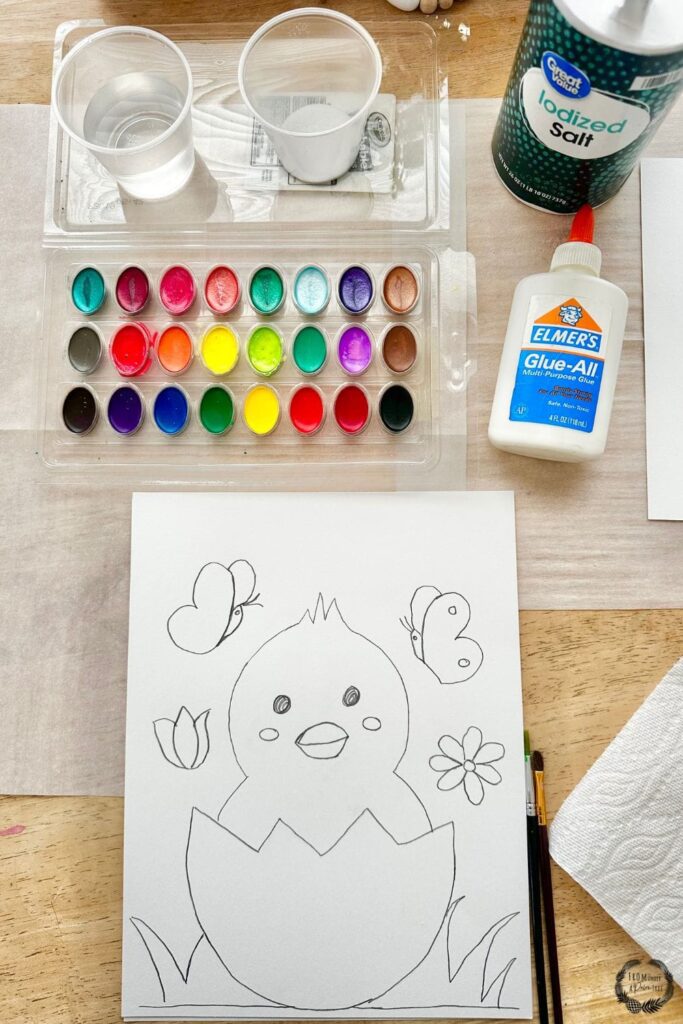
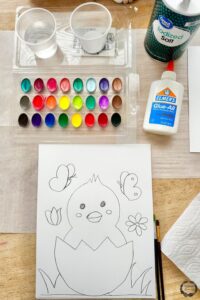
To get started with salt painting, you’ll need just a few basic supplies:
Table salt – The finer the grains, the better the absorption.
White glue (Elmer’s or school glue) – Used to create the design.
Watercolor paints or food coloring – The source of vibrant colors.
Water and paintbrushes – Essential for applying the color.
Thick paper or cardstock – To hold the glue and salt without warping.
Step-by-Step Instructions
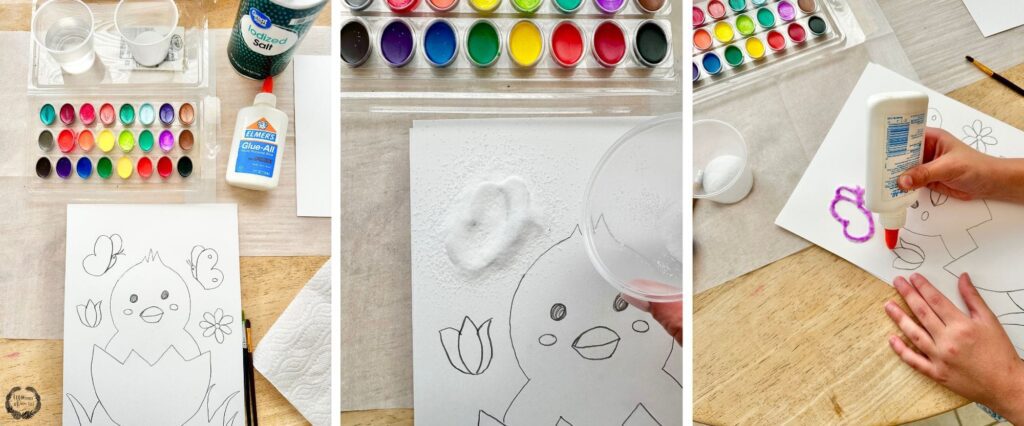
1. Create Your Design
Use white glue to draw a design on your thick paper. Print paper will be too thin. Craft paper, card stock, or cardboard works best. You can make simple shapes, intricate patterns, or even write words. Be creative!
You can download our Free Easter Salt Painting Templates below.
2. Sprinkle Salt Over the Glue
While the glue is still wet, generously sprinkle table salt over it, ensuring it covers all the lines. Gently shake off the excess salt and let it dry for a few minutes. Tip: the longer you allow the salt to dry, the less paint spreading there will be.
3. Add Color with Watercolors
Dip a paintbrush in your favorite watercolor paint and lightly touch the salted areas. Watch as the color spreads and blends beautifully along the salt lines. Experiment with different colors for a vibrant effect.

4. Let It Dry
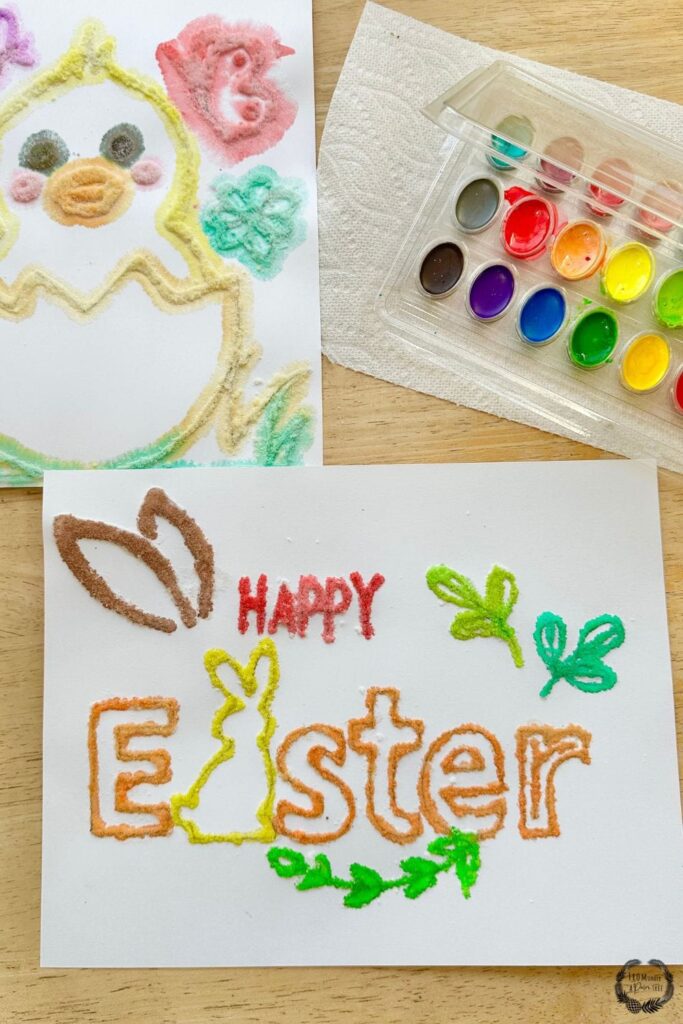
We did two different pictures. The watercolor paints were applied immediately after the glue and salt on the Easter chick painting. The second painting, the Happy Easter, we let the glue and salt dry overnight and there was far less spreading of the color.
5. Display Your Artwork
Once dry, your salt painting will have a gorgeous, crystallized texture. Frame it or use it as a unique greeting card or decoration!

Tips for Best Results
Use bright, saturated colors to create a more dramatic effect.
Avoid over-wetting the salt, as too much water can wash away the glue.
Experiment with different designs like abstract patterns, flowers, or seasonal themes.

The Science Behind Salt Painting
One of the fascinating aspects of salt painting is the way salt absorbs liquid. When watercolor touches the salted glue, capillary action causes the color to spread, creating a marbled or tie-dye effect. This makes salt painting not just an art activity but also a fun way to learn about absorption and fluid dynamics.

Salt painting is a delightful and easy craft that encourages creativity and exploration. Whether you’re making art with kids or trying it yourself, this technique offers endless possibilities for unique and colorful designs. Grab your supplies and give it a try—you’ll be amazed at the results!
Click below to download your Free Easter Salt Painting Templates
Check out our Best-Selling Etsy Printable
Related Posts:
Paper Plate Easter Bunny Craft


This post contains affiliate links and advertisements. Affiliate links and affiliate ads help support From Under A Palm Tree. They help pay for web hosting, email delivery, domain registration, and other various fees that help keep our blog operational. We appreciate your support!


- 2 packs 16 watercolor - Ultimate watercolors paint set includes 2 packs of 16 water color paint palette and 6 kids paint brushes in various sizes, includes all the components needed for kids paint set.
- Paint for kids - comes with 16 vibrant Crayola water colors, unique attached mixing palette to keep the water color paint organized and tidy, convenient and easy watercolor set for travel.
- Toddler paint brushes - 6 count of paintbrushes kids variety includes 6 different size paint brushes kids for a wide application range. Kids paint brush perfect to explore creativity in painting and crafting.
- Watercolor paint set kids - Crayola paint is washable, safe, and non-toxic. Crayola watercolor paints is a great choice for kids, preschoolers, students and art lovers.
- Perfect starter kit for watercolor painting, Everything you need water color painting set, water based colors that dissolve and blend easily, create an endless range of colors

- 2 Packs of 10 Sizes Art Brushes: 10 size professional round-pointed paintbrushes with a variety of shapes make MIXING COLOR more easy, perfect for artists, amateurs, students, teens, kids, children and painters of all levels. Wonderful gift idea for your friends and families who have fun in painting! 10 Size: 5/8 8 6 4 5 3 2 2 1 2/0; Length: 17.5 cm to 19.5 cm (6.9 to 7.7 inches).
- All-purposed Painting Brushes Sets: Nice combination of tips for design purposes, versatile miniature paint brushes allow you to do fine detailing and art painting precisely to reach tight, small spots or tiny points. Works well with oil, watercolor, acrylic, enamel, cel-vinyl, gouache paints. Great for wildlife, botanical, portraiture, doll, illustrations, miniature, model ships and airplanes, arts and craft, rock, leather, gesso and ceramic, or body, nail and face art painting.
- High Quality Craftsmanship: Artist quality small paint brushes designed with durable synthetic nylon bristles, rust-proof nickel ferrules, and sturdy wooden handles. Individually hand crafted and double-crimped with excellent workmanship so no flaking paint from handles, loose bristles or ferrules with this pro mini paint brushes set. Intended for long time use, no compromise to the performance or appearance after multiple painting and cleaning.
- Easy Maintenance: After using your fine tip paint brushes for acrylic, oil or watercolor painting, it’s very convenient to clean them with warm soapy water and reshape the paintbrush tips. Air-dry the detail brushes and store them in the carrying container in a tip-top position for long time of use. Paint brushes nylon hairs are carefully selected and will spring back perfectly after every brush strokes. They can be easily clean up with soapy warm water and reshaped with your fingers.
- Warm Tips: Clean your brushes immediately after using them, avoid scrubbing while cleaning. Never leave your brushes resting on their heads in water, solvent, or when drying. Store clean brushes vertically, head-side-up or horizontally. What You Get: 10pcs artist brushes set * 2 and friendly customer service, if you have any question with your painting kit, be free to contact us and we will make it right for you within 24 hours.

- Smooth finish for superior printing results
- Inkjet, laser, copier and offset guaranteed
- 65 pound cardstock
- Acid and lingin free for great quality that doesn't deteriorate
- 75 Sheets

- Hardcover Book
- Bergren, Lisa Tawn (Author)
- English (Publication Language)
- 40 Pages - 01/15/2013 (Publication Date) - WaterBrook (Publisher)

Hi! I’m Meagan and I’m a 41 year old mom of a high energy almost 9 year old, happily navigating my way through the little boy years. I’ve been married for 14 years. I met my husband over 20 years ago in high school; we got married 10 years later after graduating from the University of South Florida. I currently help run a family business with my parents while blogging about my life and love of DIY projects!
When I’m not at a kids sports game, I enjoy spending time with my family on a beach anywhere. I also love decorating and organizing, fun DIY projects, bargain shopping, and eating out or in! I also love Barbecue anything and a good show or movie on Netflix.
Leave a Reply